• Terms and Conditions
  • Privacy Policy
  • Cookie Policy
  • Contact Us
No Result
View All Result
NEWSLETTER
The Designest
  • Home
  • Design
  • Free Design Goods
  • Inspiration
  • Videos
  • Tutorials
  • Toolbox
  • Featured
  • Tech
  • Wallpapers
  • Home
  • Design
  • Free Design Goods
  • Inspiration
  • Videos
  • Tutorials
  • Toolbox
  • Featured
  • Tech
  • Wallpapers
No Result
View All Result
The Designest
No Result
View All Result
Home Tutorials

Tutorial: How to Edit Smart Object Layers in Photoshop

We know you’ve been struggling a lot and here’s your exhaustive and handy guide! Don’t forget to add it to the saved tabs.

Milena Abrosimova by Milena Abrosimova
February 19, 2021
in Tutorials
2
626
VIEWS
Share on FacebookShare on Twitter

The devil is in the details and sometimes you find yourself stuck on a simple step, tarnishing the success of your future great project! Nothing but frustration and exasperation stand in the way, ending up wasting your precious time. Don’t give up just yet! This demonstrative guide will make your worries fade away.
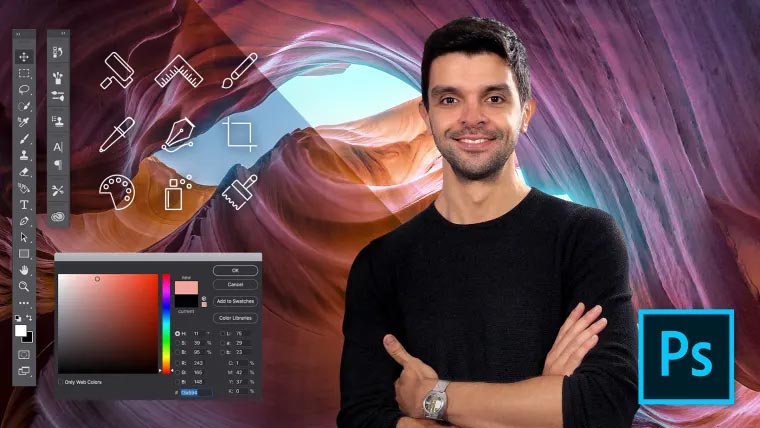
Showcase Your Artwork – Make Your Own Mockups
Showcase Your Artwork – Make Your Own Mockups in Adobe Photoshop
Maja Faber
Design Realistic Package Mockups in Adobe Photoshop
Graphic Design for Beginners: Design Realistic Package Mockups in Photoshop
Derrick Mitchell

Discover the world of craft and creativity with Skillshare and 30 days of free access! There are courses for all domains, so whatever you are interested in: photography, logo design, typography, or illustration — there is a bunch of lessons from professionals.

Start Learning For Free ➔

The market of digital goods releases unique and artistic photo effects every day, you should keep up with its pace and know your way around. Our team hasn’t passed this movement by and as a result, we’ve carried out a whole bunch of attention-worthy products. Our photo effects can be rightfully called mockups, actually, based on the magic of Smart Object Layers. What’s their benefit? They’re extremely convenient to edit the images with, saving the original state of the edited graphics.

What is Smart Object in Photoshop?

Smart Objects are layers, containing their special characteristics, allowing to save the quality of the original source image when bringing changes to the layer itself. In Photoshop effects made by the principle of a mockup template, these Smart Layer Objects are internally linked, which means that if you update the source image, the main asset with the effect changes as well.

Judging from our own experience, the starting point where everyone begins losing their patience is adding the required graphics to the Smart Layer Object. Take a deep breath, download our free Vintage Watercolor Photoshop Effect and follow us on this creative journey.

Vintage Watercolor Photoshop Effect

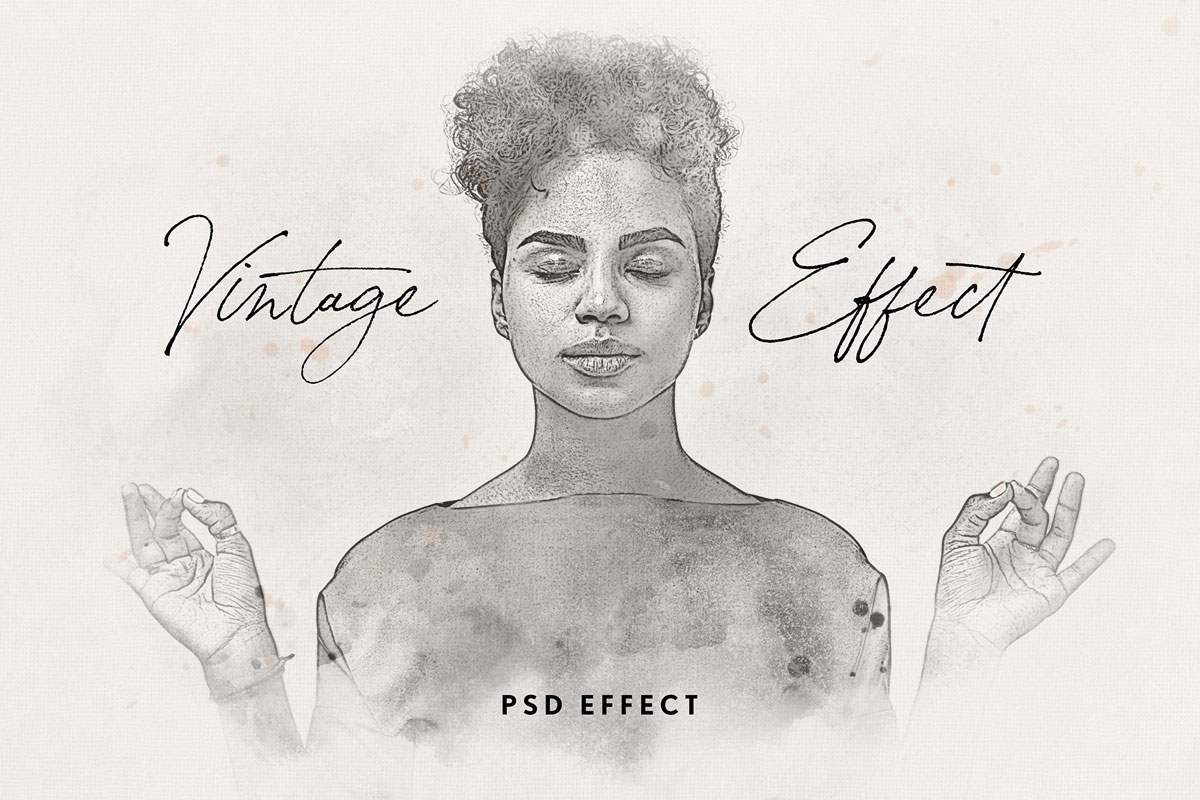
Free Watercolor Photoshop Effect

It doesn’t have to take years for your images to obtain that artistic rough look. Any graphics can become a well-aged vintage treasure, discover the power of this Photoshop effect. Water splashes, stains, unclear edges — not disadvantages but creative elements of your illustrations and photos, edited with this very effect. Enjoy that watercolor-like imagery, achievable in a couple of minutes!

Free Download

Step 1

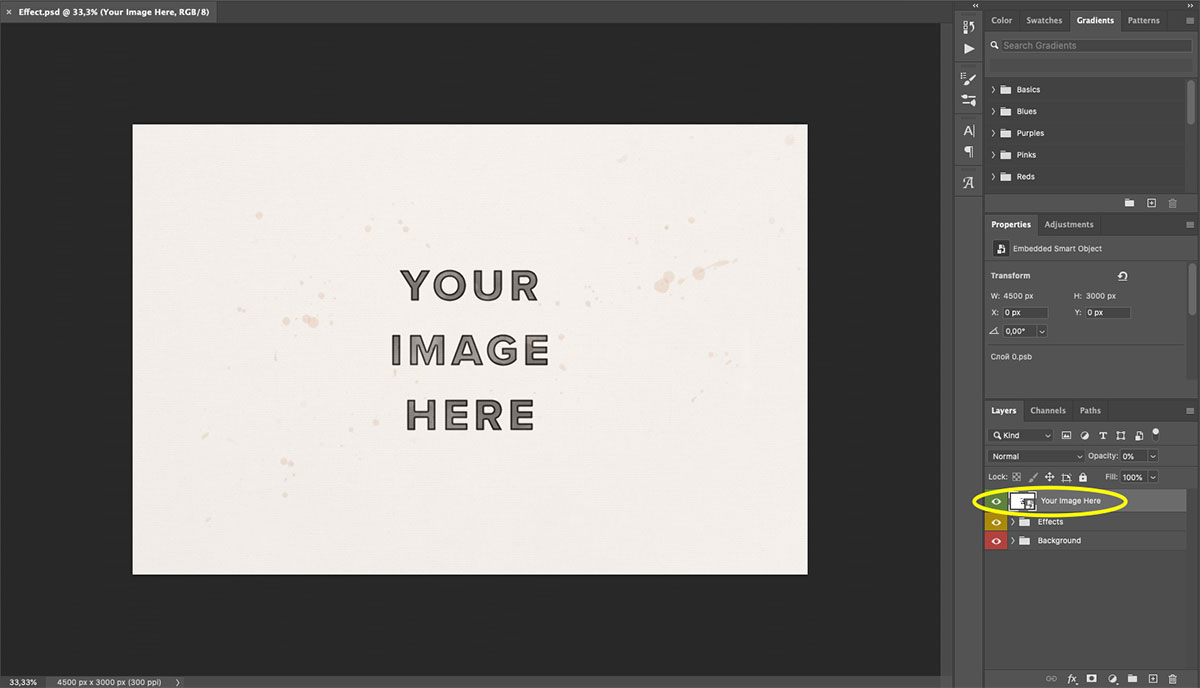
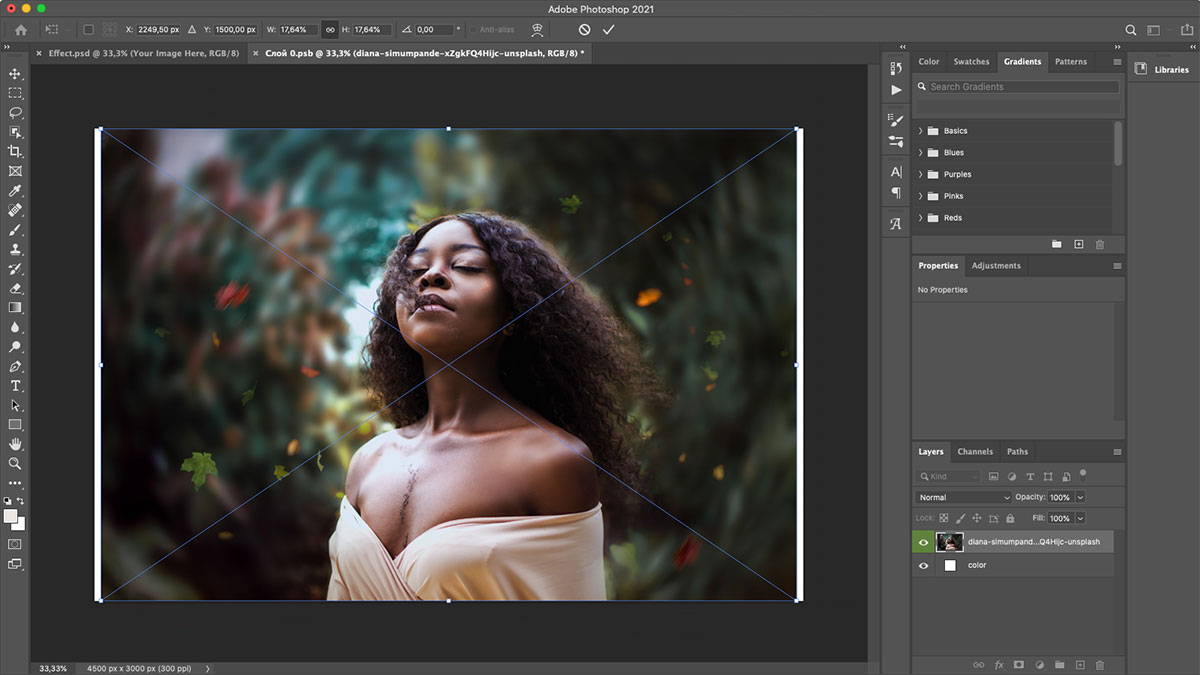
After unpacking the downloaded .zip file, open the Effect.psd in Photoshop, where you’ll see the main artboard and the layers panel on the right. Both layers and folders are marked with color; the one we’re aiming for is a green one. You need to open it and insert the image you would like to have edited. Here comes the first bump:

How to Edit Smart Object Layers in Photoshop step 1

Step 2

In order to add your graphics to the Smart Layer, you need to open it with left double-click the thumbnail of the ‘Your Image Here’ layer (not the layer itself).

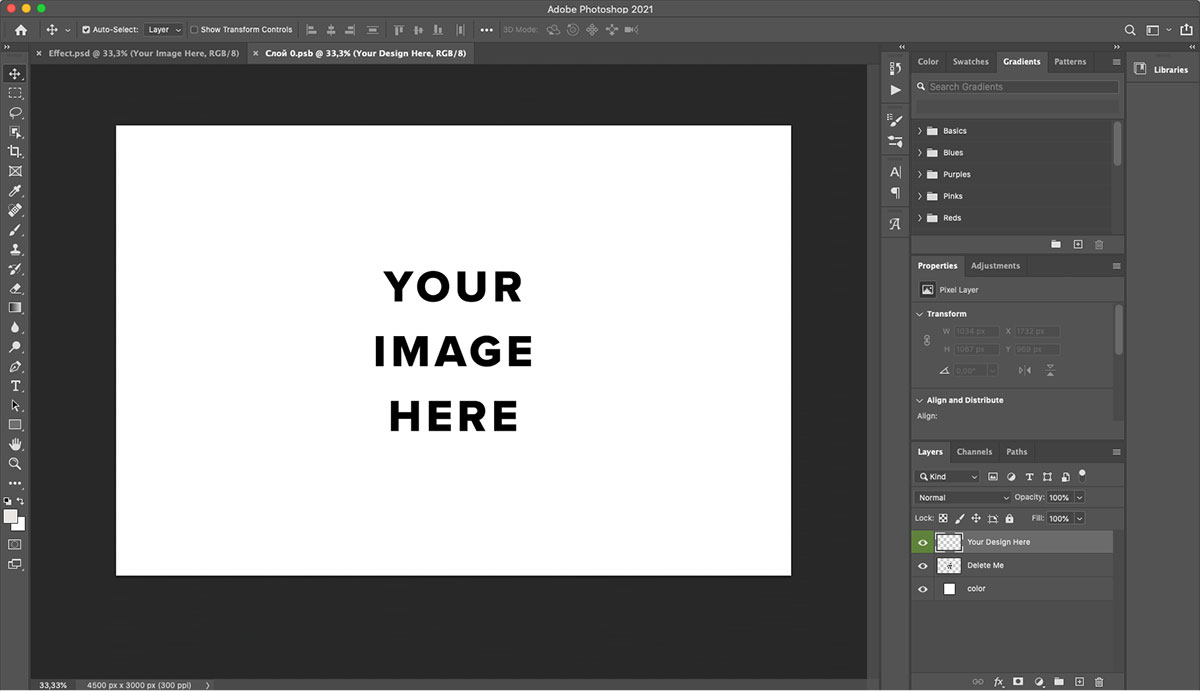
This action will open the new tab with the Smart Layer to appear in addition to the main artboard, where your graphics belongs. Now in the layers panel, you’ll notice only three given layers: ‘Your Design Here’, ‘Delete Me’, and ‘color’.

Step 3

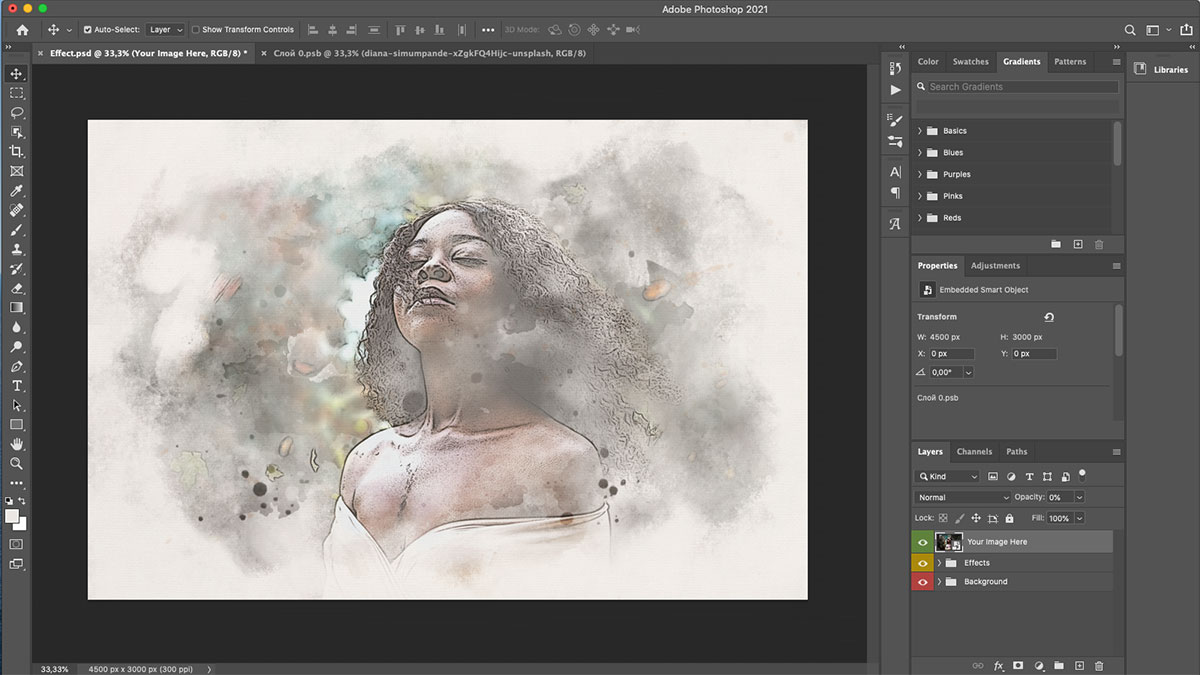
Go ahead and do what the ‘Delete Me’ layer says! When it’s gone, click the ‘Your Design Here’ layer to make it selected for future manipulations. What these will be? Dragging & dropping your image into the artboard and further edits.

Step 4

Adjust the size of your image to fit the canvas by stretching it. When everything’s in its place, press Enter. In order to add these changes to the Smart Layer and let them be that way, i’s vital to save the result. It can be done with the Cmd+S (Ctrl+S on Windows) or via the Photoshop menu panel: File > Save. Updating the Smart Layer will take some time, wait for a couple of seconds.

Updating Smart Object Layer

Step 5

It’s time to check on the main tab with the watercolor effect. Ta-daaa, the photo now looks like a beautifully-painted watercolor masterpiece!

Final Result

That’s not it, you still have other folders of effects and background to play around with. Don’t be afraid to experiment, turn on/off the layers, change the color, adjust transparency and saturation. Here’s the complete walkthrough for the Vintage Watercolor Photo Effect.

  relevant:
Tutorial: How to Install Procreate Brushes March 27, 2020
How to Add Brushes to Affinity Designer March 20, 2020
How to Install Illustrator Brushes January 24, 2020
How to Install Photoshop Brushes January 24, 2020
Next
Prev

That’s not it, you still have other folders of effects and background to play around with. Don’t be afraid to experiment, turn on/off the layers, change the color, adjust transparency and saturation. Here’s the complete walkthrough for the Vintage Watercolor Photo Effect.

Free Photo Effects

Pixel Dispersion Photo Effect
Pixel Dispersion Photo Effect Mockup
Scraped Painting Photo Effect Mockup
Matrix Dot Photoshop Effect
Matrix Dot Photoshop Effect Mockup
Get More Effects
Tags: EffectsFreebiesMockupsPhotoshopTemplates
Previous Post

Reviving the Best Futuristic Story With Evangelion Fan Art

Next Post

15+ Ultimate Web Design Tools to Bookmark Today

Milena Abrosimova

Milena Abrosimova

A huge design geek, discovering the industry through the prism of modern values and social media communication.

Related Posts

15+ Ultimate Web Design Tools to Bookmark Today

by Angela Baker
February 24, 2021
0

While web design is quite enjoyable and versatile, it can also be challenging without the proper tool stack.

Winning Creative Market Strategies: Working on Your First Design Product

by Nick «Frost» Kuznetsov
February 9, 2021
2

Everyone wants to make sales, everyone wants to build a popular shop with thousands of followers — and all these...

Winning Creative Market Strategies: Working on Your Creative Market Presence

by Greg Lapin
January 18, 2021
0

So you've joined Creative Market as a designer. At first sight, everything’s easy, but bringing up some guidelines is a...

Tips From Pro Illustrators: How to Improve Drawing Skills and Find Inspiration

by Ksenia Pedchenko
November 4, 2020
0

What is it like to be a good illustrator? We've teamed up with four fabulous artists to answer this question...

Keynote vs PowerPoint: Choosing The Best Presentation App

by Ksenia Pedchenko
June 18, 2020
0

Picking one to meet your needs, projects and state of mind.

How to Fight Digital Piracy & Whether It’s Worth It

by Ksenia Pedchenko
June 9, 2020
0

Piracy is lame, product thieves suck — but please, don’t put emphasis on them or you risk flipping out. Remember...

Next Post

15+ Ultimate Web Design Tools to Bookmark Today

Comments 2

  1. Rombout Versluijs says:
    1 week ago

    Easier said, its for a non-destructive workflow. You can edit the original layers while doing work on the smartobject layer. This alllows the user to scale up and down and keep its resolution for instance. It was photoshop god’s gift when we got it 🙂

    Reply
    • Milena Abrosimova says:
      2 days ago

      I could not agree more, Rombout 😎

      Reply

Leave a Reply Cancel reply

Your email address will not be published. Required fields are marked *

Popular Posts

  • 45+ Photoshop Text Styles & Effects: Free PSD Templates

  • 40 Plastic Texture Images

  • 100+ free wood textures, cozy and versatile

  • Realistic 3D Logo Mockups

  • 20+ Pillow Mockups For Your Designs to Rest

Envato Elements
with Envato Elements membership

Categories

  • Design (94)
  • Featured (7)
  • Fonts (8)
  • Free Design Goods (42)
  • Inspiration (120)
  • Lifestyle (3)
  • Marketing (2)
  • Mockups (8)
  • Other (6)
  • Tech (21)
  • Toolbox (104)
  • Tutorials (34)
  • Videos (30)
  • Wallpapers (27)

Connect with us

Follow us on Twitter

My Tweets
Youtube Facebook Instagram Dribbble Pinterest Twitter RSS

Subscribe

The Designest

Weekly Email Updates

We got tons of fascinating articles, videos and freebies for you every week!

SUBSCRIBE

Design Blog

  • Design
  • Featured
  • Fonts
  • Free Design Goods
  • Inspiration
  • Lifestyle
  • Marketing
  • Mockups
  • Other
  • Tech
  • Toolbox
  • Tutorials
  • Videos
  • Wallpapers

About Us

Welcome to The Designest — a professional design blog aimed to deliver fresh news & trends of the industry as well as the most essential courses & tutorials you must have been searching for.

Company

  • Contact Us
  • Cookie Policy
  • Privacy Policy
  • Terms and Conditions

© 2020 The Designest — Professional design blog aimed to deliver fresh news & trends of the industry

No Result
View All Result
  • Home
  • Design
  • Free Design Goods
  • Inspiration
  • Videos
  • Tutorials
  • Toolbox
  • Featured
  • Tech
  • Wallpapers

© 2020 The Designest — Professional design blog aimed to deliver fresh news & trends of the industry

Subscribe to Regular Updates
We got tons of fascinating articles, videos and
freebies for you every week.
This website uses cookies. By continuing to use this website you are giving consent to cookies being used. Visit our Privacy and Cookie Policy.